20 February, 2011
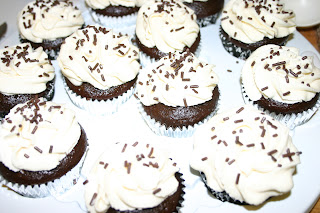
Guinness Cupcakes with Bailey's Irish (Whipped) Cream Frosting
Okay, enough healthy stuff! With this recipe, I have reached cupcake utopia! These were amazing. The cupcake itself has Guinness in the batter and though it doesn't taste alcoholic-y, it does taste deliciously different. The cake itself is also extremely moist. The addition of whipped cream frosting with bailey's in it just takes the whole thing to another dimension. This recipe would probably make a great cake too but we are partial to cupcakes at this house, as you all know. I hope that if you make them, you find them as delicious as we did.
Guinness Cupcakes
1 1/2 cups Guinness stout
1/2 cup olive oil
1/2 cup whole milk
1 tbsp vanilla extract
3 eggs
3/4 cup sour cream
2 1/2 cups all-purpose flour
3/4 cup Hershey's Special Dark Cocoa
2 cups sugar
1 1/2 tsp baking soda
Preheat oven to 350 degrees. In the mixing bowl of your stand mixer (or a bowl with a hand mixer), combine the Guinness, olive oil, milk and vanilla. Beat in each egg, one at a time and then mix in the sour cream.
In another bowl, combine the flour, cocoa, sugar and baking soda, mixing well. With the stand mixer on, slowly add the dry ingredients to the wet ingredients, being sure that everything is well mixed.
Line your cupcake pan with cupcake liners of your choice. Carefully add batter to a large ziploc bag or pastry bag. Snip end of ziploc bag. Squeeze enough batter into each cupcake liner so its 3/4 full.
Bake at 350 for 20-25 minutes or until a toothpick inserted into the center of a cupcake comes out mostly clean. Cool completely before frosting. And when I say completely, I mean COMPLETELY unless you'd like to be cleaning up melted whipped cream frosting from off every surface in your kitchen. It will happen, I've been there.
Bailey's Irish (Whipped) Cream Frosting
2 cups heavy whipping cream
2/3 cup granulated sugar
3 tbsp Bailey's Irish Cream
In the bowl of your stand mixer, add the whipping cream and sugar. Beat into oblivion, until soft peaks form when you pull the beater out of the cream. Add bailey's and beat until thoroughly distributed. Store, covered, in refrigerator until ready to use.
When cupcakes are cool, put frosting into a pastry bag with a large star tip and pipe onto each cupcake. Or you could just dollop it onto each cupcake for a more homemade rustic look. Enjoy.
18 February, 2011
Gluten-Free 'Pancakes'
 |
| I apologize for the horrible photo . The camera is broke so I'm using my phone. |
Gluten Free Pancakes
2 eggs
1 tsp vanilla extract or gf vanilla extract
1 1/2 cups almond flour
1/2 cup all natural unsweetened applesauce (Trader Joe's has a really delicious brand)
1/4 tsp salt
1/2 tsp baking soda
1/2 tsp cinnamon
1/2 tsp fresh ground nutmeg
1/2 tsp cinnamon
1/2 tsp fresh ground nutmeg
1/2 cup fresh or frozen blueberries
In a medium bowl, beat eggs. Add almond flour, applesauce, salt, baking soda, cinnamon and nutmeg to eggs and mix well. Stir in blueberries, gently. Meanwhile, heat a skillet sprayed with a little bit of olive oil. When skillet is hot, ladle about a 1/4 cup of batter onto the skillet. Repeat with as many as your skillet will hold. Cook until little bubbles appear and you can easily flip the pancake. (Time will vary depending on your stove) Flip pancakes. Continue to cook until each pancake is cooked through. Remove to warm plate. Serve with a dollop of almond butter and maple syrup and a few berries on the side.
Much thanks, again, to my cousin for her help with my gluten-free recipes!
05 February, 2011
Apple Chips
We've been trying to eat healthier in this household lately. It's not the easiest thing to do when it's cold and snowy and gross out and all you want to do is curl up inside with junk food and never leave the house, but we are trying. In an effort to find something that is snackable but in the category of "very healthy", I remembered eating apple chips as a child. I think we bought them in a bag at the health food superstore that my mother frequented when I was little. She was very health-conscious then...very, very health-conscious and therefore I blame her for my love of sweets and junk food. I was denied it in my young years so I'm making up for it now! I digress.
Anyway, back to eating healthy. Apple chips were crunchy unlike their dried apple counterparts and only slight sweet, but still delicious. So I decided to give it a shot. All the recipes I could find said to slice the apple into 1/16 inch slices. Any idea how difficult it is to slice a lopsided, slightly oblong apple into 1/16 inch slices? Nigh impossible, at least for me. Needless to say, I barely escaped with all of my fingers. I gave up then.
The next day, we went to Williams Sonoma where I bought a mandoline slicer, which is now my new best friend. This makes cutting 1/16 inch slices the easiest thing ever. That evening, I was in possession of a bowl full of apple chips! Success!
Well, minor success. My husband thinks they're gross and won't touch them. More for me then.
Apple Chips
2 large firm apples like Gala
Mandoline Slicer
Parchment Paper
Cookie Sheets
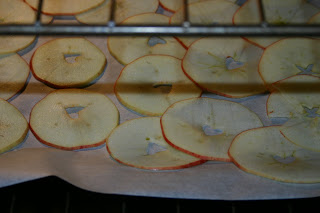
Preheat oven to 190 degrees. Slice apples 1/16 inch thick according to your slicer's instructions. I also used a heart shaped fondant cutter to remove the core from a few of the slices. The other apple I cut in half and cored with a melon baller first.
Line cookie sheets with parchment paper. Place apples on parchment and then in oven.
Bake for two hours. Remove from oven to cool.
Be prepared to consume the entire bowl in one sitting. I did.
Subscribe to:
Comments (Atom)


