Showing posts with label snacks. Show all posts

05 December, 2013

Homemade Garlic Knots


Recently, it was one of those cold wintery nights when all you want is a large blanket and comfort foods. I made spagetti for dinner; nice, warm comfort food. However, I wanted something more than that to go with it. Something else in the comfort food line, like garlic bread. Alas, no bread in the house despite the fact that I had just gone to the grocery store! I had pizza dough though. I thought about garlic breadsticks and then remembered how much Mike loves good garlic knots from the pizzeria. It couldn't be too hard to turn pizza dough into garlic knots, right? Right.

This was incredibly simple and they turned out really pretty too. These would be a great way to dress up any dinner.

Homemade Garlic Knots

1 pkg pizza dough, room temperature
1/3 cup good olive oil
3 garlic cloves, crushed
salt

Preheat oven to 350. In a small bowl, combine the olive oil, garlic and a teaspoon of salt and mix well.


Tear a small egg sized piece of dough off and roll it into a cylinder about 5-6 inches long. Take the two edges, cross them over each other, pull one end through the hole and then pull both ends to make a knot. Tuck both ends under the knot and place on a oiled baking sheet. Continue until you have used all of the dough. (How many knots you get will depend on how big you make each one. I got about a dozen.) 


When you've placed all the knots on the baking sheet, take a pastry brush and  the bowl of garlic oil and brush each knot with the oil. Make sure to get some of the crushed garlic onto each knot.


Bake knots for about 12 minutes or until they are golden brown on top. Remove from oven and allow to cool slightly. Serve with marinara sauce for dipping.


02 May, 2013

Spring Rolls


If there is one thing I crave about Chinese food, it would be spring rolls. I love them. Sometimes I try to convince Mike that we need to order Chinese just so I can have spring rolls. I have now discovered that that is no longer necessary as I can now make them whenever I want!

Who knew that the local grocery store carried both spring roll wrappers AND bean sprouts?? Okay, apparently a lot of people knew it but I didn't. I made this discovery while grocery shopping with my Mama, who was not nearly as excited as I was about this. Now, if I had discovered really good Thai-style peanut sauce, she would have felt differently. Alas, that seems to be eluding us. I digress.

Anyway, this turned out to be one of those great moments in culinary trials. You know those days where you say, "Okay, I'm going to make this but I highly doubt it's going to work." And then...it turns out to be more spectacularly delicious than you could even have imagined? This was one of those kind of moments. Added bonus: incredibly easy!

disclaimer: These are probably far from authentic. Nor is this probably the right way to do any of this. But it tastes good. 

Spring Rolls

1 package egg roll wrappers
1 shallot, minced
1 large garlic clove, minced
1/2 cup bean sprouts
1/2 cup shredded carrots
1/2 cup shredded cabbage
1/2 cup mushrooms, sliced and then sliced again (photo below explains what I'm talking about)
about 2 tbsp low sodium soy sauce
a few tbsp olive oil
a little bowl with about 1/4 cup water and a heaping tsp of flour added to it
a few more tbsp olive oil

In a medium saute pan, heat olive oil on medium heat. Add shallots and garlic and saute till slightly golden, about 1 minute. Add mushrooms and cook for another 1-2 minutes, stirring occasionally, until mushrooms are becoming soft. Add bean sprouts, carrots and cabbage and stir again so everything gets along well.


With the lid to your saute pan ready, pour in soy sauce and immediately cover to trap the steam. Keep covered for 1 minute. remove cover and stir  again. Remove from heat and set aside to cool slightly.

Pull out one egg roll wrapper. Lay it diagonally with one cover pointing towards you. Place that little bowl of flour water near you as well.


Add about two tablespoons of filling to the center of the wrapper and spread it out lengthwise.


Lift the corner that is pointing at you, fold it over the filling and lightly stuff the corner under the filling.


Now grab the corner on the left and fold it towards the right side like one side of an envelope, making sure to stuff any escaping filling back in. Also make sure that there isn't a little hole near the bottom fold or there will be filling escape-age later.  Repeat with corner on the right, folding it toward the left, thereby completing the bottom portion on an envelope.


Now, dip a finger in the flour water and swipe it across one side of the flap portion on your envelope. Dip again and swipe across the other side. This will provide a nice seal. Think of it as envelope glue, but tastier. Now take both your hands and grasp the bottom portion of the envelope with filling and roll it towards the flap, all the while making sure to lightly squish all the filling in and creating a roll. Press down the flap to ensure it is sealed and set aside.

success!  
Repeat until there is no more filling left. I usually get about four rolls out the above recipe but it may depend upon how full you make the rolls.

Now to cook them. In a skillet or saute pan, heat a few tbsp of olive oil. (you could probably also use grapeseed oil or other oil with a higher smoke point)  When oil is hot, place your rolls into the oil gently, so as not to splash. Fry about 2 minutes per side or until each side is golden brown (keep an eye on this because they can burn quick). Because this is in a pan and not a deep fryer, the rolls will be slightly rectangular but, oh well.


When all sides are golden brown, remove to a paper towel lined plate. Allow to cool slightly and serve.

Dipping sauce possibilities: There is of course duck sauce, located usually in the ethnic foods aisle of most groceries. Trader Joe's sells a positively delightful Sweet Chili Sauce that compliments this perfectly. Or, if you want to go completely from scratch and make one yourself, try my recipe for sweet chili sauce that I made to compliment homemade chicken nuggets.

Hope you enjoy these.


24 April, 2012

Jalapeno Poppers


A while ago, we visited my sister-in-law and family. As you've probably noticed, everything in our family seems to revolve around food. In fact most of the things we do seem to revolve around food. Anyway, when we went to visit, we ate at this restaurant called McAllister's that served loaded baked potatoes that are the size of a loaf of bread. Seriously, they were enormous potatoes and they were amazingly delicious. I must go again.


Anyway, onto the jalapenos. My brother-in-law made these awesome jalapenos on the grill. He filled each jalapeno half with cream cheese and cheddar cheese and wrapped each one with a strip of uncooked bacon and then cooked them on the grill somehow. I'm not really certain exactly how he did it but it was quite delicious.

Being that we live in an apartment whose builders did not see the benefit of putting a window in the kitchen, I am unable to cook anything that is going to smoke badly. This unfortunately includes cooking bacon on the stove. (I can cook it in the oven in the Alton Brown method) So how to recreate these delicious morsels without having the fire department called to my house...again?

Apartment Friendly Jalapeno Poppers

warning: I strongly suggest wearing food grade vinyl gloves when making this recipe. There is nothing worse than getting jalapeno juice on your fingers and then itching your eye. Trust me.

5 jalapenos, sliced in half lengthwise and without stem
1/3 cup cream cheese, room temperature
2 handfuls grated Cheddar cheese
1/4 cup chopped pancetta or bacon pieces

Preheat oven to 350.

Cook pancetta or bacon in a small frying pan dusted with a little olive oil spray over medium heat until cooked and fragrant and a little crispy, about five minutes depending on the size of each piece.
(Our local Trader Joe's sells chopped pancetta. Most grocery stores will sell either slices of pancetta or a small hunk of pancetta that you can chop yourself.)


Meanwhile, scoop all of the seeds and the little vein-y things that the seeds attach to out of each jalapeno. (I use the edge of a melon baller for this, it seems to work well) Set jalapeno halves aside.

In a small bowl, mix cream cheese, cheddar cheese and the cooked pancetta together until the ingredients are evenly distributed. The heat from the pancetta will cause the cheeses to melt a little but that's okay.

With a spoon or spatula, fill each jalapeno half with about a tbsp of cheese mixture. Place all halves  on a cookie sheet and bake for about 15 minutes until the jalapenos get a little wrinkly and golden brown on top.  Remove from oven and allow to cool slightly before serving.

You could also sprinkle more cheddar cheese on top of each half either before or after they come out of the oven.


Enjoy!

I'm sorry I didn't take more photos of the process or the finished product. I got busy making them and forgot and then we were too busy eating them to care about photography.

07 September, 2011

Buffalo Chicken Wontons

Yum, yum, yum!
Confession: I have a minor obsession with Buffalo sauce. I love it, whether it be on chicken wings, pizza or nachos, I love it. Recently, my husband and I sampled this delectable vehicle in which to enjoy copious amounts of buffalo sauce. I mean, what could be better then a fried little pouch of creamy chicken-y goodness with just the right amount of buffalo sauce? I simply had to recreate this while on vacation and did so with the great help of a junior cook.  And it was definitely worth it. They were a huge hit with everyone in the house and completely disappeared quickly. Even the most picky of the group loved them.

Buffalo Chicken Wontons
Filling:

2 boneless, skinless chicken breasts, cooked and cut into quarters
3/4 cup cream cheese
1/2 cup blue cheese crumbles
2 - 3 tbsp ranch dressing, plus more for dipping
1/4 cup - 1/2 cup Frank's Red Hot Sauce
salt and pepper to taste

Other ingredients:
oil for frying
1 package wonton wrappers
ranch or blue cheese dressing for dipping

Combine ingredients in a food processor and pulse until mixture is of desired consistency. It shouldn't be overly mushy or the consistency of soup but it shouldn't be overly chunky either. Sneak a taste, or two, about now to determine if you want to add more hot sauce, ranch dressing, salt or pepper.

Perfect consistency


In a large saute pan, heat oil over medium heat. There should be enough oil in the pan to come up the sides of the pan about an inch.

Retrieve a wonton wrapper and fill it with a heaping 1/2 tbsp of filling.


Seal the edges of the wonton by rubbing all edges with a little warm water, using your fingers, then fold the wonton in half to resemble a triangle and press edges down well.

Drop wonton triangle in oil and fry for a couple of minutes, turning once to ensure browning on both sides. Remove from oil and allow to drain on paper towels. Repeat with remaining wontons.


Serve warm with your choice of dipping sauce. Enjoy these. I am.

05 February, 2011

Apple Chips


We've been trying to eat healthier in this household lately. It's not the easiest thing to do when it's cold and snowy and gross out and all you want to do is curl up inside with junk food and never leave the house, but we are trying. In an effort to find something that is snackable but in the category of "very healthy", I remembered eating apple chips as a child. I think we bought them in a bag at the health food superstore that my mother frequented when I was little. She was very health-conscious then...very, very health-conscious and therefore I blame her for my love of sweets and junk food. I was denied it in my young years so I'm making up for it now! I digress.

Anyway, back to eating healthy. Apple chips were crunchy unlike their dried apple counterparts and only slight sweet, but still delicious. So I decided to give it a shot. All the recipes I could find said to slice the apple into 1/16 inch slices. Any idea how difficult it is to slice a lopsided, slightly oblong apple into 1/16 inch slices? Nigh impossible, at least for me. Needless to say, I barely escaped with all of my fingers. I gave up then.

The next day, we went to Williams Sonoma where I bought a mandoline slicer, which is now my new best friend. This makes cutting 1/16 inch slices the easiest thing ever. That evening, I was in possession of a bowl full of apple chips! Success!

Well, minor success. My husband thinks they're gross and won't touch them. More for me then.


Apple Chips

2 large firm apples like Gala
Mandoline Slicer                                                  
Parchment Paper
Cookie Sheets

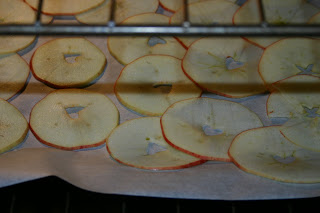
Preheat oven to 190 degrees. Slice apples 1/16 inch thick according to your slicer's instructions. I also used a heart shaped fondant cutter to remove the core from a few of the slices. The other apple I cut in half and cored with a melon baller first.

Line cookie sheets with parchment paper. Place apples on parchment and then in oven.
Bake for two hours. Remove from oven to cool.

Be prepared to consume the entire bowl in one sitting. I did.

17 January, 2011

Fried Pickles!

 
The other day, we went out with friends to a restaurant that had fried pickles listed as an appetizer. Now, I love pickles and I, unfortunately, have an affinity for fried things as well. But together, I wasn't really sure about that. But since I've had fried green beans before and loved them, we gave it a shot.

They were rather awesome! The pickle was still crunchy as it should be but now it was covered with a light breading and accompanied by a creamy and slightly tangy sauce. When I got home, I decided to try it and see if I could make them without the need of a deep fryer, which I don't have due to the teeny-ness of my kitchen. (and because fried things are not high on the good-for-you chart)

Success! They were perfect, almost exactly the same as the ones in the restaurant and delicious!! So for all of you who love pickles, this is how you make them even better:

Fried Pickles

1 jar dill pickle spears
1/4 cup olive oil
1/2 cup flour
1 beaten egg
panko breadcrumbs

Heat olive oil in a frying pan over medium heat. Meanwhile, put flour, beaten egg and breadcrumbs in three different shallow plates.


Remove pickle spears from pickle juice and pat dry with paper towels. Coat one pickle in flour, shake to remove excess. Coat in egg and then in breadcrumbs.


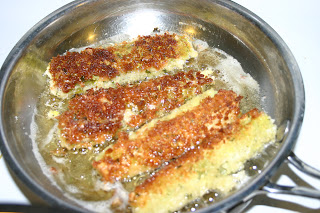
Place gently in frying pan and fry about two minutes on each side, or until each side is golden brown.  Repeat with remaining pickles. Remove from pan and drain on paper towels. Allow to cool slightly before serving.


To make the dipping sauce:

1/2 cup Greek yogurt or sour cream

1 tbsp lemon juice
1 tbsp fresh dill
1 garlic clove, crushed
2 tbsp olive oil


Combine all ingredients in a small bowl. Stir thoroughly. Cover and refrigerate until ready to serve. Enjoy.

06 August, 2010

Low-Carb Crackers


Since I am currently on a low carb, very very low carb, diet, I have to get a little creative. Since regular crackers are off-limits, I have improvised with almond meal. Most grocery stores carry Bob's Red Mill Almond Meal or if you live near a Trader Joe's, they carry it also.

Almond Meal Crackers

1 1/2 cups almond meal

1/2 tsp garlic powder

1/4 tsp cayenne pepper

2 tbsp water, plus more if necessary

In a food processor (I use my teeny one for this), combine almond meal, garlic powder and cayenne. Pulse to combine. Add 2 tbsp water. Pulse well. Mixture should be slightly wet and sticking together to the walls of the food processor bowl but not be soupy. It might need a teeny bit more water, I'd add it in teaspoon fulls and continue to mix between additions.


Dump mixture onto a piece of parchment paper and cover with another piece of parchment paper. With a rollong pin. roll out dough between the two pieces of parchment. When dough is 1/8 of an inch thick, peel top piece of parchment paper off and discard. Slide the bottom piece of parchment with dough onto a cookie sheet.


Bake at 350 degrees for 10 minutes, then start checking every couple of minutes. There is a fine line between cooked and burnt. Burnt crackers are NOT a nice kitchen smell.  When crackers are golden brown, remove from the oven and allow to cool.

These are great with cheese and pepperoni; a piece of lunchmeat or even peanut butter. Yum!
 
Miss Adventures in a Tiny Kitchen. Design by Pocket