20 February, 2011

Guinness Cupcakes with Bailey's Irish (Whipped) Cream Frosting


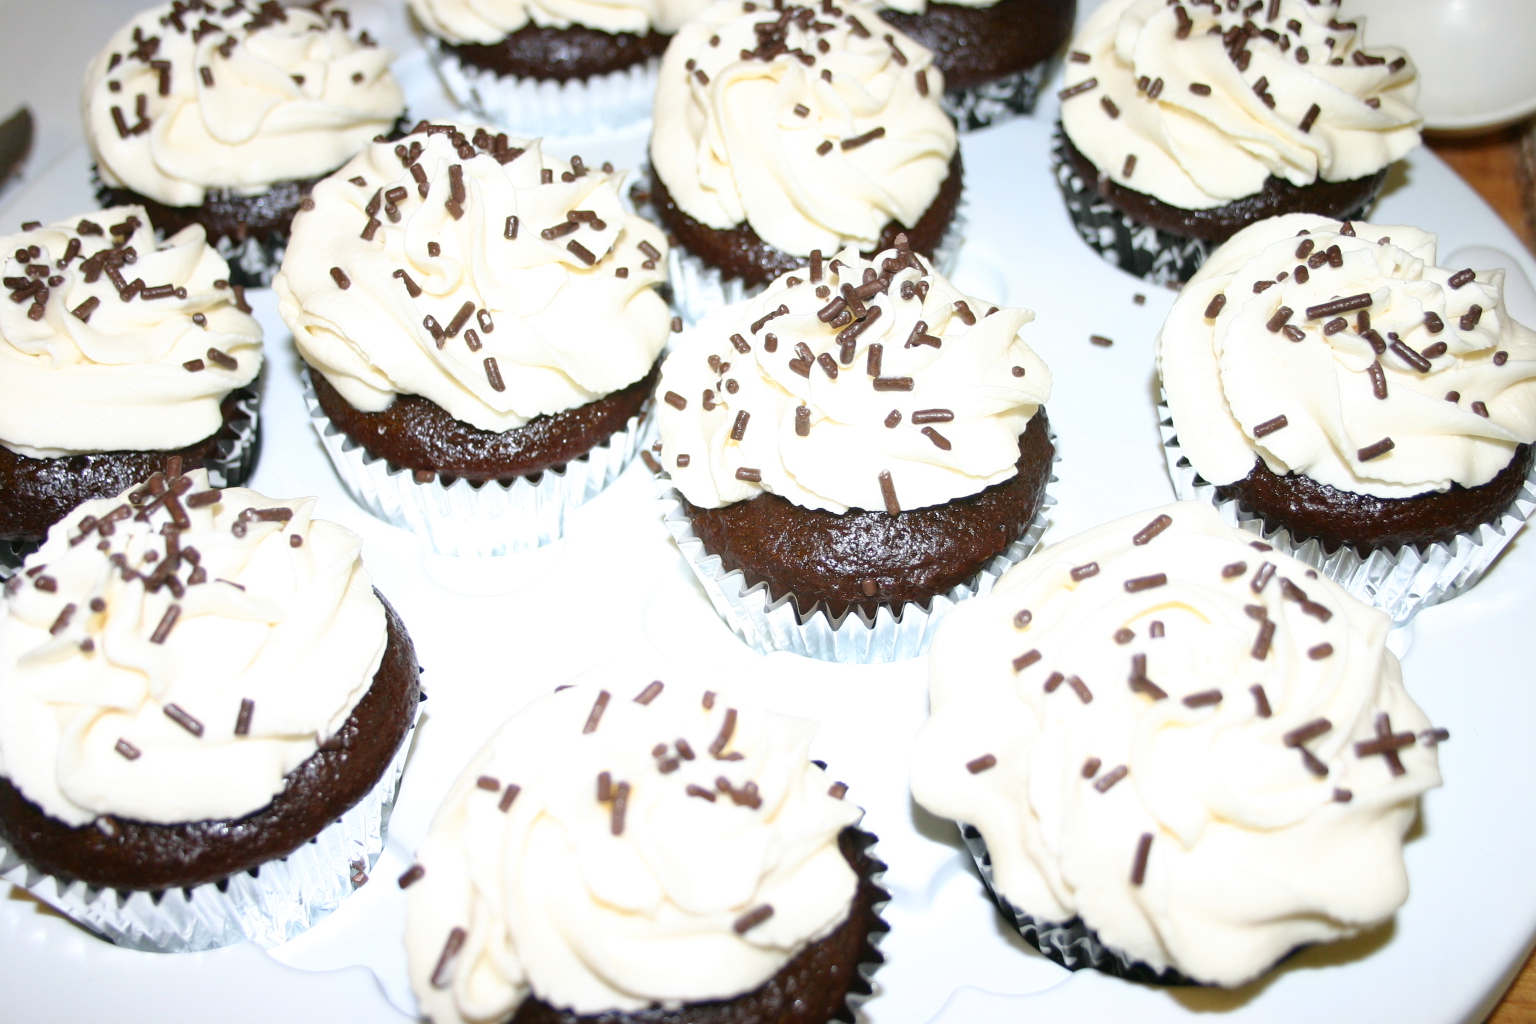
 Okay, enough healthy stuff! With this recipe, I have reached cupcake utopia! These were amazing. The cupcake itself has Guinness in the batter and though it doesn't taste alcoholic-y, it does taste deliciously different. The cake itself is also extremely moist. The addition of whipped cream frosting with bailey's in it just takes the whole thing to another dimension. This recipe would probably make a great cake too but we are partial to cupcakes at this house, as you all know. I hope that if you make them, you find them as delicious as we did.

Guinness Cupcakes

1 1/2 cups Guinness stout
1/2 cup olive oil
1/2 cup whole milk
1 tbsp vanilla extract
3 eggs
3/4 cup sour cream
2 1/2 cups all-purpose flour
3/4 cup Hershey's Special Dark Cocoa
2 cups sugar
1 1/2 tsp baking soda

Preheat oven to 350 degrees.  In the mixing bowl of your stand mixer (or a bowl with a hand mixer), combine the Guinness, olive oil, milk and vanilla. Beat in each egg, one at a time and then mix in the sour cream.
In another bowl, combine the flour, cocoa, sugar and baking soda, mixing well.  With the stand mixer on, slowly add the dry ingredients to the wet ingredients, being sure that everything is well mixed.

Line your cupcake pan with cupcake liners of your choice. Carefully add batter to a large ziploc bag or pastry bag. Snip end of ziploc bag. Squeeze enough batter into each cupcake liner so its 3/4 full.

Bake at 350 for 20-25 minutes or until a toothpick inserted into the center of a cupcake comes out mostly clean. Cool completely before frosting. And when I say completely, I mean COMPLETELY unless you'd like to be cleaning up melted whipped cream frosting from off every surface in your kitchen. It will happen, I've been there.

Bailey's Irish (Whipped) Cream Frosting

2 cups heavy whipping cream
2/3 cup granulated sugar
3 tbsp Bailey's Irish Cream

In the bowl of your stand mixer, add the whipping cream and sugar. Beat into oblivion, until soft peaks form when you pull the beater out of the cream. Add bailey's and beat until thoroughly distributed. Store, covered, in refrigerator until ready to use.

When cupcakes are cool, put frosting into a pastry bag with a large star tip and pipe onto each cupcake. Or you could just dollop it onto each cupcake for a more homemade rustic look.  Enjoy.


18 February, 2011

Gluten-Free 'Pancakes'

I apologize for the horrible photo . The camera is broke so I'm using my phone.
As I said before, we are trying to eat a little healthier in this household. Pancakes with butter and peanut butter and maple syrup and chocolate chips really don't fall under the healthy eating category, although every now and then, they still make for a great indulgent breakfast. But what if you want pancakes but still want to be a little healthy, or what if you don't want/can't have the wheat in pancakes? I happened to find this great gluten-free pancake recipe. With some blueberries in the batter and a little almond butter on top with a little maple syrup, it's still mildly indulgent without the guilt.

Gluten Free Pancakes

2 eggs
1 tsp vanilla extract or gf vanilla extract
1 1/2 cups almond flour
1/2 cup all natural unsweetened applesauce (Trader Joe's has a really delicious brand)
1/4 tsp salt
1/2 tsp baking soda
1/2 tsp cinnamon
1/2 tsp fresh ground nutmeg
1/2 cup fresh or frozen blueberries

In a medium bowl, beat eggs. Add almond flour, applesauce, salt, baking soda, cinnamon and nutmeg to eggs and mix well. Stir in blueberries, gently. Meanwhile, heat a skillet sprayed with a little bit of olive oil. When skillet is hot, ladle about a 1/4 cup of batter onto the skillet. Repeat with as many as your skillet will hold.  Cook until little bubbles appear and you can easily flip the pancake. (Time will vary depending on your stove) Flip pancakes. Continue to cook until each pancake is cooked through. Remove to warm plate. Serve with a dollop of almond butter and maple syrup and a few berries on the side. 

Much thanks, again, to my cousin for her help with my gluten-free recipes!

05 February, 2011

Apple Chips


We've been trying to eat healthier in this household lately. It's not the easiest thing to do when it's cold and snowy and gross out and all you want to do is curl up inside with junk food and never leave the house, but we are trying. In an effort to find something that is snackable but in the category of "very healthy", I remembered eating apple chips as a child. I think we bought them in a bag at the health food superstore that my mother frequented when I was little. She was very health-conscious then...very, very health-conscious and therefore I blame her for my love of sweets and junk food. I was denied it in my young years so I'm making up for it now! I digress.

Anyway, back to eating healthy. Apple chips were crunchy unlike their dried apple counterparts and only slight sweet, but still delicious. So I decided to give it a shot. All the recipes I could find said to slice the apple into 1/16 inch slices. Any idea how difficult it is to slice a lopsided, slightly oblong apple into 1/16 inch slices? Nigh impossible, at least for me. Needless to say, I barely escaped with all of my fingers. I gave up then.

The next day, we went to Williams Sonoma where I bought a mandoline slicer, which is now my new best friend. This makes cutting 1/16 inch slices the easiest thing ever. That evening, I was in possession of a bowl full of apple chips! Success!

Well, minor success. My husband thinks they're gross and won't touch them. More for me then.


Apple Chips

2 large firm apples like Gala
Mandoline Slicer                                                  
Parchment Paper
Cookie Sheets

Preheat oven to 190 degrees. Slice apples 1/16 inch thick according to your slicer's instructions. I also used a heart shaped fondant cutter to remove the core from a few of the slices. The other apple I cut in half and cored with a melon baller first.

Line cookie sheets with parchment paper. Place apples on parchment and then in oven.
Bake for two hours. Remove from oven to cool.

Be prepared to consume the entire bowl in one sitting. I did.

25 January, 2011

Gluten-Free Apple "Crisp"


So many are doing the gluten-free thing including a cousin of mine, so I decided to try some gluten-free recipes. Cutting down on the wheat isn't necessarily a bad thing anyway. I really love apple crisp but the topping is very carb and gluten heavy so I came up with a topping that isn't. And it turned out surprisingly good. It was crunchy and sweet and perfect on the cold snowy days we've been getting so much of.

Apple "Crisp"

2 granny smith apples, peeled, cored and sliced
2 gala apples, peeled, cored and sliced
1/2 cup almond meal
1/4 cup sliced almonds
1/4 cup chopped hazelnuts
1 1/2  tsp cinnamon
1 tsp nutmeg
1 tbsp butter, melted
1 tbsp maple syrup
1 tsp vanilla or gf vanilla

Spray a baking dish with Pam spray (or its equivalent). Layer apples in baking dish and sprinkle with 1/2 tsp cinnamon and 1/2 tsp nutmeg.

In a bowl, combine almond meal, almonds, hazelnuts, 1 tsp cinnamon and 1/2 tsp nutmeg. Mix well.

In another small bowl, combine melted butter, maple syrup and vanilla.

Pour butter mixture over almond mixture and mix with a fork until it resembles coarse crumbs.


Dump the mixture over the apple and spread evenly.  Bake at 350 for 40 minutes or until the topping is golden brown and the kitchen smells of beautifully baked apples! Enjoy.

Since this is very healthy, it would make a great breakfast too.

17 January, 2011

Fried Pickles!

 
The other day, we went out with friends to a restaurant that had fried pickles listed as an appetizer. Now, I love pickles and I, unfortunately, have an affinity for fried things as well. But together, I wasn't really sure about that. But since I've had fried green beans before and loved them, we gave it a shot.

They were rather awesome! The pickle was still crunchy as it should be but now it was covered with a light breading and accompanied by a creamy and slightly tangy sauce. When I got home, I decided to try it and see if I could make them without the need of a deep fryer, which I don't have due to the teeny-ness of my kitchen. (and because fried things are not high on the good-for-you chart)

Success! They were perfect, almost exactly the same as the ones in the restaurant and delicious!! So for all of you who love pickles, this is how you make them even better:

Fried Pickles

1 jar dill pickle spears
1/4 cup olive oil
1/2 cup flour
1 beaten egg
panko breadcrumbs

Heat olive oil in a frying pan over medium heat. Meanwhile, put flour, beaten egg and breadcrumbs in three different shallow plates.


Remove pickle spears from pickle juice and pat dry with paper towels. Coat one pickle in flour, shake to remove excess. Coat in egg and then in breadcrumbs.


Place gently in frying pan and fry about two minutes on each side, or until each side is golden brown.  Repeat with remaining pickles. Remove from pan and drain on paper towels. Allow to cool slightly before serving.


To make the dipping sauce:

1/2 cup Greek yogurt or sour cream

1 tbsp lemon juice
1 tbsp fresh dill
1 garlic clove, crushed
2 tbsp olive oil


Combine all ingredients in a small bowl. Stir thoroughly. Cover and refrigerate until ready to serve. Enjoy.

07 January, 2011

Apartment Friendly "BBQ" Pulled Pork

 
As I may or may not have mentioned before, my tiny kitchen is, alas, not blessed with any semblance of outdoor space, save for the front stoop. Therefore, true barbecue anything is not something I can actually accomplish. However, since visiting a barbecue serving restaurant establishment last week, we've been craving barbecue here. Stumbling upon a recipe in Real Simple,  I made faux barbecue, and it wasn't half bad. Of course, to those die-hard BBQ fans, I realize this amounts to practically sacrilege. But hey, when you're having a craving and in a pinch...

Faux Pulled Pork Sandwiches

1 pork tenderloin, cut in four pieces crosswise

your favorite barbecue sauce

red wine vinegar

sesame buns

coleslaw (optional)

french fries (optional)

Place pork tenderloin pieces in a large saucepan with 1/2 cup water, 1/2 cup barbecue sauce, 1 tbsp red wine vinegar.


Simmer, covered about 20 minutes until tenderloin is "fork-tender". Remove from pan and shred tenderloin with a fork.


Mix with a little more barbecue sauce. Serve on sesame buns with a side of coleslaw and french fries.


As I said, it's not true BBQ but it really was good. 

22 December, 2010

Warm Winter Salad...yes warm.


I was all in the middle of posting another recipe but I have put that on hold to give you all this one. THIS IS FABULOUS!! I swear it's just as mind-blowingly flavor packed as the original panzanella but it's warm! Which makes it great for winter. Who wants to eat salad in the freezing winter months? Coming home from outside shoveling snow to eat......salad?!?!? No thank you! I personally want warmth and hearty flavors. Unfortunately, I also have an aversion to broth based soups. I love cream based soups but broth based: chicken noodle, french onion, minestrone, nope, not interested. But, that's really for another post.

I found this in a Martha Stewart magazine about the Tartine Bakery in San Francisco. I wish I had known about this bakery when I was there this summer. Alas. But thanks to Martha, I can enjoy some of the recipes from there, including this amazing salad.

It's the perfect answer to my need for hearty flavors and warmth. I was a little worried about making it since the original recipe called for lettuce that my husband has termed 'spiny lettuce' and categorically refuses to eat because it stabs him in the mouth. He had a bad experience once. Long story.

Anyway, digressing again. In order to make it more palatable to him, I did change the recipe a little bit. I also didn't have all the ingredients for the original dressing but mine came out great so here it all is...

Warm Winter Salad

Herb Vinaigrette

1 tsp dried thyme
1 tsp dried tarragon
1/2 cup olive oil
2 tbsp white wine vinegar
1 tbsp lemon juice
1 large clove garlic, crushed
1 1/2 tbsp Dijon mustard

Combine, mix thoroughly. Set aside.

Salad

1 loaf really good Italian or sourdough bread, sliced thickly
3 small Belgian endives, leaves separated
1 bag butter lettuce/radicchio mix
1 bag spring mix greens
4 strips bacon, cooked and crumbled
1/2 cup hazelnuts, toasted
1/2 cup Parmesan cheese

Either in the oven or on a grill pan, toast each slice on both sides until golden brown. I added a smidgen of butter to each side and a sprinkling of cayenne pepper for extra oomph. While that's toasting, get all the lettuces together for a rinsing. Pat dry. Toast the hazelnuts also.

Bad idea.
I thought it'd be a great time saver to just toss the nuts onto the grill pan with the bread. I was wrong. It took forever trying to scoop them up off the pan before they burned. They tasted great but I'd still recommend you toast them in the oven on a cookie sheet. Much easier to handle.

When the bread is done toasting, remove and slice into roughly 1 inch cubes.


Now toss the lettuce onto the hot grill pan. I'm not kidding. I got the idea from that Brewery I visited in Monteray Bay. Although the lettuce won't get the charcoal flavor from a grill pan, it does heat up the lettuce. Only leave the lettuce on the grill pan for two minutes, turning once.

 
Remove lettuce to plates. Top with bread pieces, hazelnuts, bacon and Parmesan cheese.

Stir dressing and pour over the top of each salad. Serve immediately.

YUM!
 If anybody does make this, I'd love to know what you think. Oh, and hubby said this is definitely a 'keep' recipe, despite the weird lettuces. He did really appreciate the omission of the spiny lettuce also.


Miss Adventures in a Tiny Kitchen. Design by Pocket